無料天気予報API【OpenWeatherMap】を使ってiPhoneのアプリ風の天気予報デモを作成してみました。
作成の流れを「APIの呼び出し編」「天気背景アニメーション作成編」に分けて記事にしていきたいと思います。 今回は、【OpenWeatherMap】APIの呼び出し編です。
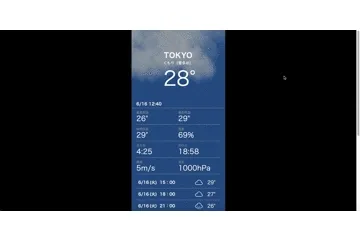
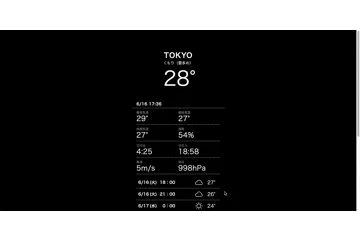
作成したDEMOは以下で確認できます。
【OpenWeatherMap】とは
【OpenWeatherMap】は無料で利用できる天気予報APIです。(有料プランあり)
無料で利用できるAPIの項目は以下の通り(1分間に60コール/1ヶ月に1,000,000コールまで)
- 現在の天気
- 3時間ごと5日間の天気予報
- 天気図1.0
- 天気予報
- UV指数
- 気象ステーション
今回はその中でも、以下のAPIを使用してデモを作成していきます。
- 現在の天気
- 3時間ごと5日間の天気予報
【OpenWeatherMap】APIの使い方
APIキーを取得する
【OpenWeatherMap】の使い方は難しくありません。 まずは使用するためのAPIキーを取得しちゃいましょう。 下記のURLにアクセスして、アカウントを作成します。

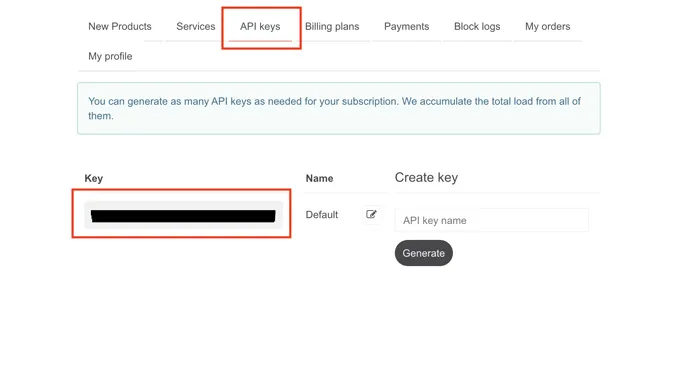
アカウントが作成できたら「API keys」に移動して「key」をコピーすればOKです。
【OpenWeatherMap】のデータを確認してみる
API keyの取得が出来たので早速【OpenWeatherMap】を使っていきます。どのような情報が取得できるのかを確認するために便利な、Chrome拡張アプリの「
」を使用してみます。試しに東京の現在の天気を取得してみます。 以下のページにアクセスします。
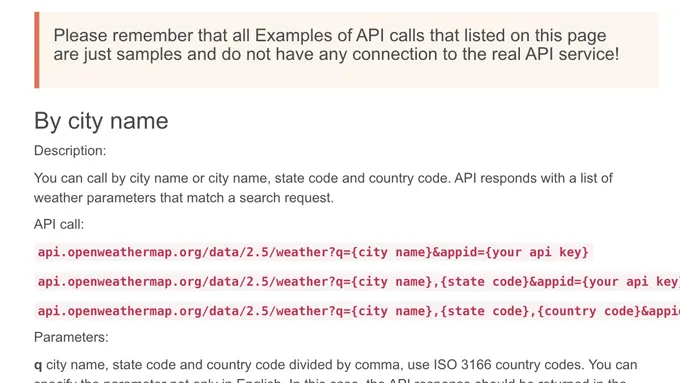
現在の天気を取得するためのAPI呼び出しURLが確認できます。これを先ほどの「
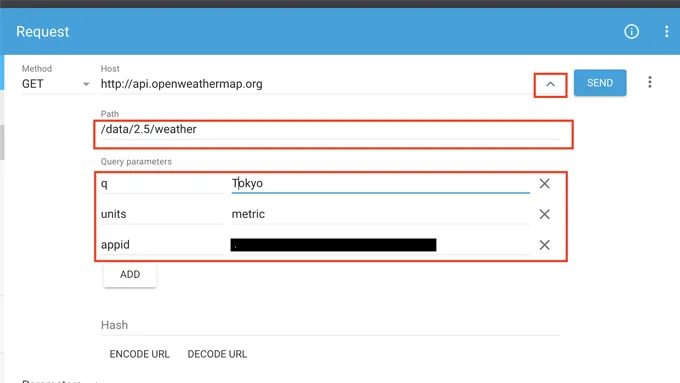
」に入力していきます。HostにURLを入力した後、右のタブをクリックすると、Pathとパラメータ を入力する項目が出てきます。
現在の天気を取得したいので Pathを「/data/2.5/weather」 パラメータに取得したい場所(東京)と温度を摂氏で表示するための「units=metric」と先ほど取得したAPI keyを入力します。
入力できたら「SEND」を押します。
以下のようにデータが表示出来ていればOKです。 ※API keyを取得したばかりだと反映まで若干のタイムラグがあるので表示されない場合があります。
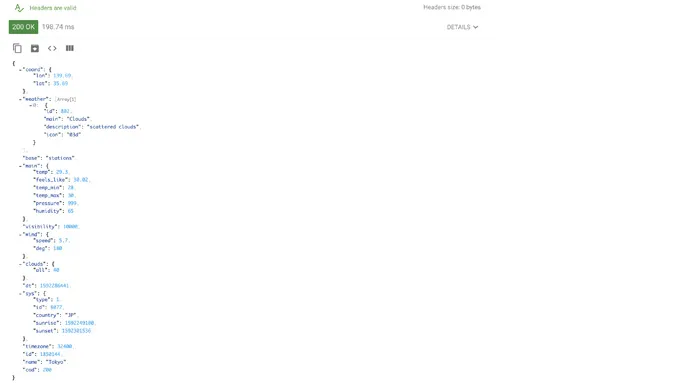
現在の天気APIで取得できるデータ
現在の天気用APIで取得できる情報を確認していきます。 以下取得したJSONのサンプルです。
{ "coord": { "lon": 139.69, "lat": 35.69 }, "weather": [{ "id": 802, "main": "Clouds", "description": "scattered clouds", "icon": "03d" }], "base": "stations", "main": { "temp": 29.64, "feels_like": 30.54, "temp_min": 28, "temp_max": 31.67, "pressure": 999, "humidity": 65 }, "visibility": 10000, "wind": { "speed": 5.7, "deg": 180 }, "clouds": { "all": 40 }, "dt": 1592286962, "sys": { "type": 1, "id": 8077, "country": "JP", "sunrise": 1592249100, "sunset": 1592301536 }, "timezone": 32400, "id": 1850144, "name": "Tokyo", "cod": 200}現在の天気APIで取得できる情報が以下になります。 この取得できる情報を利用して天気予報のデモを作成していきます。
| 概要 | ||
|---|---|---|
| coord | lon | 都市の地理的位置、経度 |
| lat | 都市の地理的位置、緯度 | |
| weather | id | 気象条件ID |
| main | 気象パラメータのグループ(雨、雪、極端など) | |
| description | 気象情報詳細 | |
| icon | 天気アイコンID | |
| base | 内部パラメータ | |
| main | temp | 温度 |
| feels_like | 体感温度 | |
| pressure | 大気圧(sea_levelまたはgrnd_levelデータがない場合は海面に)、hPa | |
| humidity | 湿度、% | |
| temp_min | 現在の最低気温 | |
| temp_max | 現在の最高気温 | |
| sea_level | 海面の気圧、hPa | |
| grnd_level | 地上レベルの大気圧、hPa | |
| wind | speed | 風速。 |
| 単位のデフォルト:メートル/秒、メートル法:メートル/秒、インペリアル:マイル/時。 | ||
| deg | 風向、度(気象) | |
| gust | 突風。 | |
| 単位のデフォルト:メートル/秒、メートル法:メートル/秒、インペリアル:マイル/時 | ||
| clouds | all | 曇り、% |
| rain | 1h | 過去1時間の雨量、mm |
| 3h | 過去3時間の雨量、mm | |
| snow | 1h | 過去1時間の積雪量、mm |
| 3h | 過去3時間の積雪量、mm | |
| dt | データ計算の時間、UNIX、UTC | |
| sys | type | 内部パラメータ |
| id | 内部パラメータ | |
| message | 内部パラメータ | |
| country | 国コード(GB、JPなど) | |
| sunrise | 日の出時刻、UNIX、UTC | |
| sunset | 日没時間、UNIX、UTC | |
| timezone | UTCから秒単位でシフト | |
| id | 都市ID | |
| name | 都市の名前 | |
| cod | 内部パラメータ |
3時間ごと5日間の天気予報
続いて3時間ごと5日間の天気予報APIのデータを確認していきます。 以下のページから現在の天気同様にURLが確認できます。
以下のようなJSONで取得できます。
{ "cod": "200", "message": 0, "cnt": 40, "list": [{ "dt": 1592298000, "main": { "temp": 28.35, "feels_like": 26.78, "temp_min": 27.17, "temp_max": 28.35, "pressure": 1000, "sea_level": 1001, "grnd_level": 997, "humidity": 56, "temp_kf": 1.18 }, "weather": [{ "id": 802, "main": "Clouds", "description": "scattered clouds", "icon": "03d" }], "clouds": { "all": 36 }, "wind": { "speed": 6.68, "deg": 178 }, "sys": { "pod": "d" }, "dt_txt": "2020-06-16 09:00:00" }, { "dt": 1592308800, "main": { "temp": 26.21, "feels_like": 24.81, "temp_min": 25.31, "temp_max": 26.21, "pressure": 1002, "sea_level": 1003, "grnd_level": 998, "humidity": 57, "temp_kf": 0.9 }, "weather": [{ "id": 500, "main": "Rain", "description": "light rain", "icon": "10n" }], "clouds": { "all": 37 }, "wind": { "speed": 5.4, "deg": 41 }, "rain": { "3h": 0.25 }, "sys": { "pod": "n" }, "dt_txt": "2020-06-16 12:00:00" } //省略 ]}データに一覧は以下に。現在の天気のデータアクセスと一部違う箇所があるので注意が必要です。
| 概要 | |||
|---|---|---|---|
| code | 内部パラメータ | ||
| message | 内部パラメータ | ||
| city | id | 都市ID | |
| name | 都市の名前 | ||
| coord | lat | 都市の地理的位置、緯度 | |
| lon | 都市の地理的位置、経度 | ||
| country | 国コード(GB、JPなど) | ||
| timezone | UTCから秒単位でシフト | ||
| cnt | このAPI呼び出しによって返された行数 | ||
| list | dt | 予測されるデータの時間、UNIX、UTC | |
| main | temp | 温度 | |
| feels_like | 体感温度 | ||
| temp_min | 現在の最低気温 | ||
| temp_max | 現在の最高気温 | ||
| pressure | デフォルトでの海面の気圧、hPa | ||
| sea_level | 海面の気圧、hPa | ||
| grnd_level | 地上レベルの大気圧、hPa | ||
| humidity | 湿度、% | ||
| temp_kf | 内部パラメータ | ||
| weather | id | 気象条件ID | |
| main | 気象パラメータのグループ(雨、雪、極端など) | ||
| description | 気象情報詳細 | ||
| icon | 天気アイコンID | ||
| clouds | all | 曇り、% | |
| wind | speed | 風速。 | |
| 単位のデフォルト:メートル/秒、メートル法:メートル/秒、インペリアル:マイル/時。 | |||
| deg | 風向、度(気象) | ||
| rain | 3h | 過去3時間の雨量、mm | |
| snow | 3h | 過去3時間の積雪量、mm | |
| dt_txt | 予測されるデータの時間、ISO、UTC |
jQuery ajaxでデータを取得する
引き続きJavaScript(jQuery)を使用してデータを取得して表示していきます。以下の関数でAPIから取得します。
JS
var API_KEY = '00000000000000000000';var defaultCity = 'Tokyo';//現在の天気を取得function currentWeather() {    $.ajax({            url: '//api.openweathermap.org/data/2.5/weather?q=' + defaultCity + ',jp&units=metric&appid=' + API_KEY,            dataType: 'json',            type: 'GET'        })        .done(function (data) {            //呼び出した時の処理        })        .fail(function (data) {            console.log('現在の天気を取得出来ませんでした。')        });}
//3時間ごとの天気を取得function threeWeather() {    $.ajax({            url: '//api.openweathermap.org/data/2.5/forecast?q=' + defaultCity + ',jp&units=metric&appid=' + API_KEY,            dataType: 'json',            type: 'GET'        })        .done(function (data) {            //呼び出した時の処理            })        })        .fail(function (data) {            console.log('3時間ごとの天気を取得出来ませんでした。')        });}
これで引数「data」から情報にアクセスできるようになりました。 続いて必要なデータを格納してDOM要素に描写するようにします。
取得したデータを格納する
取得したデータから表示したい内容を変数に格納していきます。 天気予報の時間帯を表示するための関数も用意します。
JS
var city = {  name: "",  date: "",  time: "",  weather: "",  description: "",  temp: "",  tempMin: "",  tempMax: "",  feelsLike: "",  pressure: "",  humidity: "",  windSpeed: "",  WindSpeedUnit: "",  windDeg: "",  cloudsAll: "",  sunriseDate: "",  sunriseTime: "",  sunsetDate: "",  sunsetTime: "",};var current = {  day: "",  month: "",  date: "",  hours: "",  minitutes: "",  time: "",  timeText: "",};
//データ格納function getWeatherData(data) {  data.name ? (city.name = data.name.toUpperCase()) : city.name;  city.description = data.weather[0].description;  city.date = new Date(data.dt * 1000);  city.temp = Math.round(data.main.temp);  city.tempMin = Math.round(data.main.temp_min);  city.tempMax = Math.round(data.main.temp_max);  city.feelsLike = Math.round(data.main.feels_like);  city.pressure = Math.round(data.main.pressure);  city.humidity = Math.round(data.main.humidity);  city.windSpeed = Math.round(data.wind.speed);  city.windDeg = Math.round(data.wind.deg);  city.cloudsAll = Math.round(data.clouds.all);  data.sys.sunrise    ? (city.sunriseDate = new Date(data.sys.sunrise * 1000))    : (city.sunriseDate = undefined); //unixtime to date  data.sys.sunset    ? (city.sunsetDate = new Date(data.sys.sunset * 1000))    : (city.sunsetDate = undefined); //unixtime to date  if (city.sunriseDate && city.sunsetDate) {    city.sunriseTime =      city.sunriseDate.getHours() + ":" + city.sunriseDate.getMinutes();    city.sunsetTime =      city.sunsetDate.getHours() + ":" + city.sunsetDate.getMinutes();  } else {    city.sunriseTime = "-";    city.sunsetTime = "-";  }}
//日付&時間取得function createDate(date) {  current.day = date;  current.month = current.day.getMonth() + 1;  current.date = current.month + "/" + current.day.getDate();  current.hours = current.day.getHours();  current.minitutes = ("0" + current.day.getMinutes()).slice(-2);  current.time = current.hours + ":" + current.minitutes;  current.timeText = current.date + " " + current.time;}
DOM要素に描写する
変数に格納したデータをDOM要素に描写していきます。 ベースとなるHTMLを作成します。
現在の天気をベースに描写して、「weather-report」に3時間ごとの天気予報を描写させるようにします。
HTML
<div class="city-wrap"> <h2 id="city-name" class="city-name"></h2> <div id="weather-discription" class="weather-discription"></div> <div id="weather-temp" class="weather-temp big"></div> <div id="weather-date" class="weather-date"></div> <div class="detail-list"> <div class="detail-item"> <div class="text">最高気温</div> <div id="tempMax" class="value tempMin"></div> </div> <div class="detail-item"> <div class="text">最低気温</div> <div id="tempMin" class="value tempMax"></div> </div> <div class="detail-item"> <div class="text">体感気温</div> <div id="feelsLike" class="value feelsLike"></div> </div> <div class="detail-item"> <div class="text">湿度</div> <div id="humidity" class="value humidity"></div> </div> <div class="detail-item"> <div class="text">日の出</div> <div id="sunrise" class="value sunrise"></div> </div> <div class="detail-item"> <div class="text">日の入</div> <div id="sunset" class="value sunset"></div> </div> <div class="detail-item"> <div class="text">風速</div> <div id="windSpeedUnit" class="value windSpeedUnit"></div> </div> <div class="detail-item"> <div class="text">気圧</div> <div id="pressure" class="value pressure"></div> </div> </div> <div class="weather-reportWrap"> <div id="weather-report" class="weather-report"></div> </div></div>描写用の単位を変数で用意します。3時間ごとの天気予報は曜日も描写するようにします。
JS
var UNIT = {  TEMP: "°",  PRESSURE: "hPa",  HUMIDITY: "%",  WINDSPEED: "m/s",  MIDDLE_DOT: ":",};//DOM要素に描写function domWeatherWrite() {  $("#city-name").html(city.name);  $("#weather-temp").html(city.temp + UNIT.TEMP);  $("#tempMin").html(city.tempMin + UNIT.TEMP);  $("#tempMax").html(city.tempMax + UNIT.TEMP);  $("#feelsLike").html(city.feelsLike + UNIT.TEMP);  $("#humidity").html(city.humidity + UNIT.HUMIDITY);  $("#sunrise").html(city.sunriseTime);  $("#sunset").html(city.sunsetTime);  $("#windSpeedUnit").html(city.windSpeed + UNIT.WINDSPEED);  $("#pressure").html(city.pressure + UNIT.PRESSURE);  $("#weather-date").html(current.timeText);  $(".detail-list").css("display", "flex");}
//DOM要素に描写 3時間ごとverfunction domThreeWeatherWrite(data, i) {  var week = new Array("(日)", "(月)", "(火)", "(水)", "(木)", "(金)", "(土)");  var dt = data.list[i].dt_txt;  var date = new Date(dt.replace(/-/g, "/"));  date.setHours(date.getHours() + 9);  var month = date.getMonth() + 1;  var day = month + "/" + date.getDate();  var week = week[date.getDay()];  var time = date.getHours() + ":00";  var main = data.list[i].weather[0].main.toLowerCase();  var html =    '<div class="weather-reportItem">' +    '<div class="weather-day">' +    day +    "</div>" +    '<div class="weather-week">' +    week +    "</div>" +    '<div class="weather-time">' +    time +    "</div>" +    '<div class="weather-main ' +    main +    '"></div>' +    '<div class="weather-temp">' +    Math.round(data.list[i].main.temp) +    UNIT.TEMP +    "</div>" +    "</div>";  return html;}
天気予報の詳細情報を日本語で表示させる
天気予報の詳細情報「discription」を分岐させて内容を日本語に変換しておきます。「discription」の種類は以下から確認できます。(サンプルコードでの日本語変換は全部対応は出来ていません。)
//天気情報分岐function getDiscription(disc) { switch (disc) { case "clear sky": return $("#weather-discription").html("快晴"); break; case "few clouds": return $("#weather-discription").html("くもり(雲少なめ)"); break; case "scattered clouds": return $("#weather-discription").html("くもり(雲ふつう)"); break; case "broken clouds": return $("#weather-discription").html("くもり(雲多め)"); break; case "overcast clouds": return $("#weather-discription").html("くもり(雲多め)"); break; case "light intensity shower rain": return $("#weather-discription").html("小雨のにわか雨"); break; case "shower rain": return $("#weather-discription").html("にわか雨"); break; case "heavy intensity shower rain": return $("#weather-discription").html("大雨のにわか雨"); break; case "light rain": return $("#weather-discription").html("小雨"); break; case "moderate rain": return $("#weather-discription").html("雨"); break; case "heavy intensity rain": return $("#weather-discription").html("大雨"); break; case "very heavy rain": return $("#weather-discription").html("激しい大雨"); break; case "rain": return $("#weather-discription").html("雨"); break; case "thunderstorm": return $("#weather-discription").html("雷雨"); break; case "snow": return $("#weather-discription").html("雪"); break; case "mist": return $("#weather-discription").html("靄"); break; case "tornado": return $("#weather-discription").html("強風"); break; default: return disc; }}用意した関数を発火させる
最後に用意した関数を起動させます。 現在の天気と3時間ごとの天気予報の読み込み完了後に発火させていきます。 3時間ごとの天気予報はclickイベントで詳細を現在の天気と入れ替えれる仕様にします。
//現在の天気を取得function currentWeather() {  $.ajax({    url:      "//api.openweathermap.org/data/2.5/weather?q=" +      defaultCity +      ",jp&units=metric&appid=" +      API_KEY,    dataType: "json",    type: "GET",  })    .done(function (data) {      getWeatherData(data);      createDate(city.date);      getDiscription(city.description);      domWeatherWrite();    })    .fail(function (data) {      console.log("現在の天気を取得出来ませんでした。");    });}
//3時間ごとの天気を取得function threeWeather() {  $.ajax({    url:      "//api.openweathermap.org/data/2.5/forecast?q=" +      defaultCity +      ",jp&units=metric&appid=" +      API_KEY,    dataType: "json",    type: "GET",  })    .done(function (data) {      var insertHTML = "";      for (var i = 0; i <= 12; i++) {        insertHTML += domThreeWeatherWrite(data, i);      }      $("#weather-report").html(insertHTML);
      $(".weather-reportItem").click(function () {        var targetNum = $(this).index();        getWeatherData(data.list[targetNum]);        createDate(new Date(data.list[targetNum].dt * 1000));        getDiscription(city.description);        domWeatherWrite();        $("body, html").animate(          {            scrollTop: 0,          },          300,          "linear",        );      });    })    .fail(function (data) {      console.log("3時間ごとの天気を取得出来ませんでした。");    });}
function weatherInit() {  currentWeather();  threeWeather();}weatherInit();
これで以下のようにデータを描写することが出来ました。
最後に
今回は、無料天気予報API【OpenWeatherMap】を使ってiPhoneのアプリ風の天気予報デモを紹介いたしました。